4. 案例01:手写一个RPC框架
4.1 RPC原理
RPC(Remote Procedure Call),即远程过程调用,它是一种通过网络从远程计算机程序上请求服务,而不需要了解底层网络实现的技术。常见的 RPC 框架有:阿里的 Dubbo, Spring 旗下的 Spring Cloud Feign,Google 出品的 gRPC等。
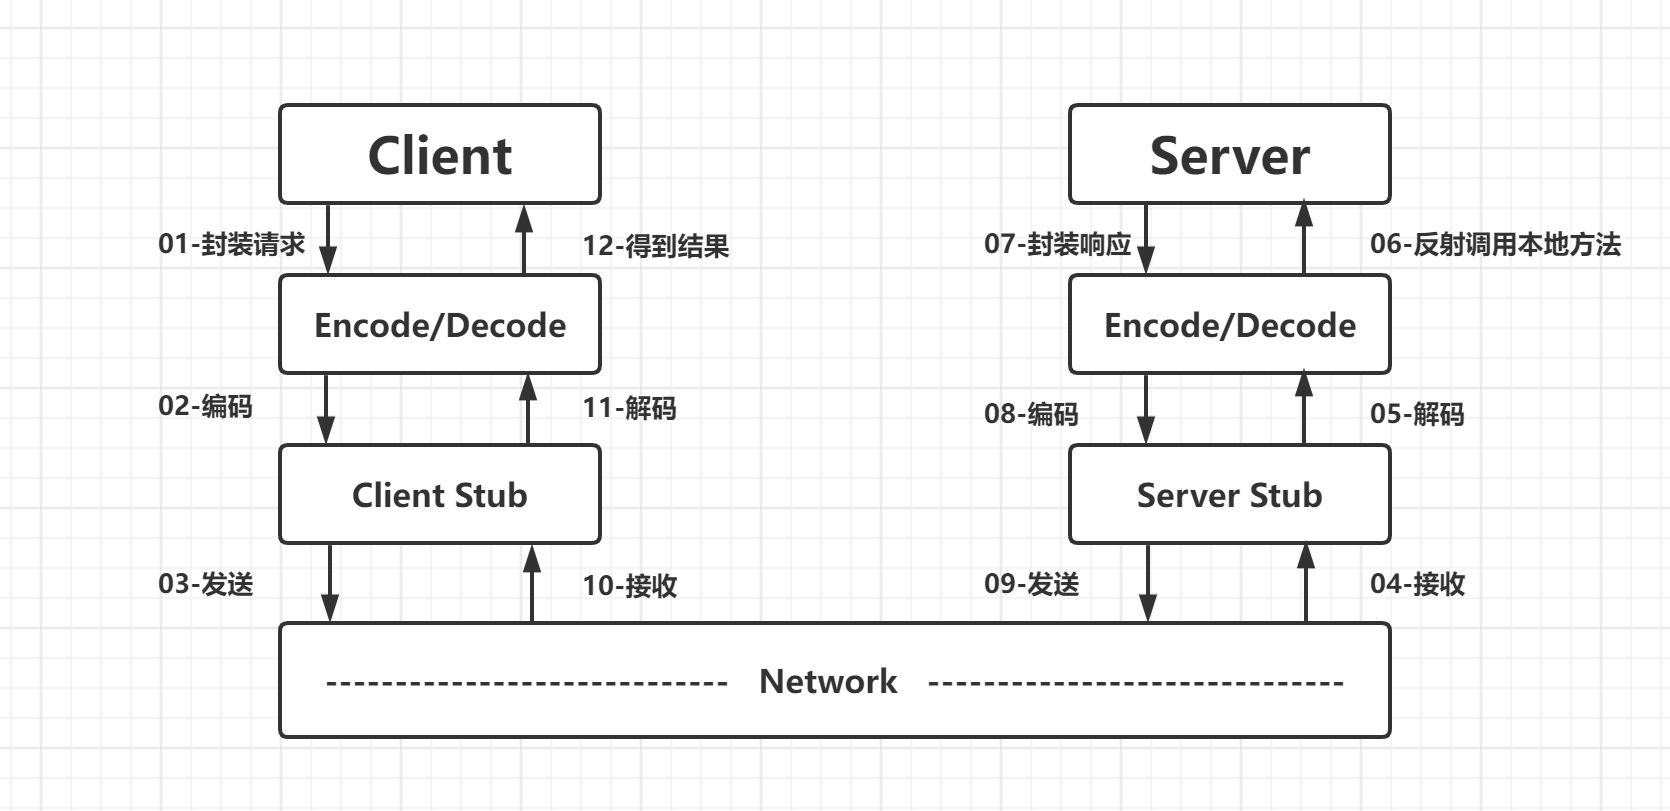
服务消费方(client)以本地调用方式调用服务
client stub(可以用nio,netty实现) 接收到调用后,负责将方法、参数等封装成能够进行网络传输的消息体
client stub 将消息进行编码并发送到服务端
server stub 收到消息后进行解码
server stub 根据解码结果调用提供者
本地服务执行并将结果返回给 server stub
server stub 将返回导入结果进行编码并发送至消费方
client stub 接收到消息并进行解码
服务消费方(client)得到结果RPC 的目标就是将 2-8 这些步骤都封装起来,用户无需关心这些细节,可以像调用本地方法一样即可完成远程服务调用。接下来我们基于 Netty 自己动手写一个 RPC,名为HeroRPC。
4.2 框架设计结构图
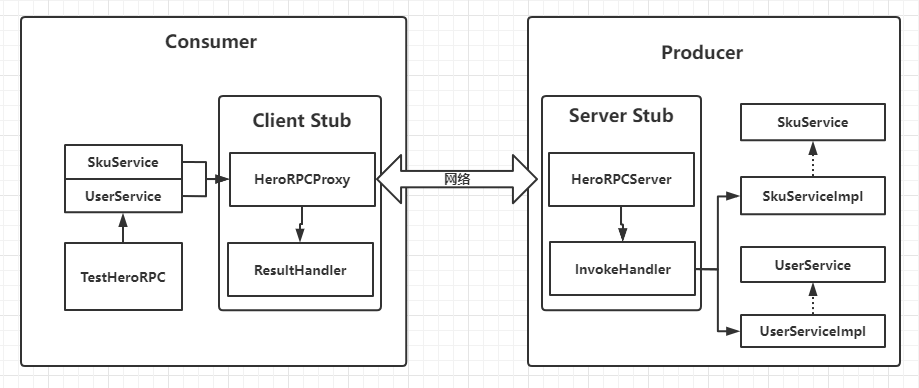
服务的调用方:两个接口【服务提供方决定】+ 一个包含 main 方法的测试类
Client Stub: 一个客户端代理类 + 一个客户端业务处理类
RPCProxy
ResultHandler
服务的提供方:两个接口 + 两个实现类
Server Stub: 一个网络处理服务器 + 一个服务器业务处理类
Server
InvokeHandler
注意:服务调用方的接口必须跟服务提供方的接口保持一致(包路径可以不一致)
最终要实现的目标是:在 TestNettyRPC 中远程调用 SkuServiceImpl 或UserServiceImpl中的方法
4.3 代码实现
4.3.1 Server服务的提供方:
1)SkuService接口与实现类
package org.example.rpc.producer;

/*
 * @author huangwei
 * @emaill 1142488172@qq.com
 * @date 2024/1/1 19:33
 */

public interface SkuService {
    String findName(String name);
}
package org.example.rpc.producer.impl;

/*
 * @author huangwei
 * @emaill 1142488172@qq.com
 * @date 2024/1/1 19:34
 */

import org.example.rpc.producer.SkuService;

public class SkuServiceImpl implements SkuService {
    @Override
    public String findName(String name) {
        return "sku{}:"+name;
    }
}
2)UserService接口与实现类
package org.example.rpc.producer;

/*
 * @author huangwei
 * @emaill 1142488172@qq.com
 * @date 2024/1/1 19:35
 */
public interface UserService {
    String findById();
}
package org.example.rpc.producer.impl;

/*
 * @author huangwei
 * @emaill 1142488172@qq.com
 * @date 2024/1/1 19:36
 */

import org.example.rpc.producer.UserService;

public class UserServiceImpl implements UserService {
    @Override
    public String findById() {
        return "user{id=1,username=weige}";
    }

}
上述代码作为服务的提供方,我们分别编写了两个接口和两个实现类,供消费方远程调用。
4.3.2 Server Stub部分
1.传输的消息封装类:
package org.example.rpc.server;

/*
 * @author huangwei
 * @emaill 1142488172@qq.com
 * @date 2024/1/1 19:37
 */

import java.io.Serializable;

public class ClassInfo implements Serializable {

    private String className;//类名
    private String methodName;//方法名
    private Class<?>[] types;//参数类型
    private Object[] objects;//参数列表

    public String getClassName() {
        return className;
    }

    public void setClassName(String className) {
        this.className = className;
    }

    public String getMethodName() {
        return methodName;
    }

    public void setMethodName(String methodName) {
        this.methodName = methodName;
    }

    public Class<?>[] getTypes() {
        return types;
    }

    public void setTypes(Class<?>[] types) {
        this.types = types;
    }

    public Object[] getObjects() {
        return objects;
    }

    public void setObjects(Object[] objects) {
        this.objects = objects;
    }
}
上述代码作为实体类用来封装消费方发起远程调用时传给服务方的数据。
2.服务端业务处理类:Handler
package org.example.rpc.server;

import io.netty.channel.ChannelHandlerContext;
import io.netty.channel.ChannelInboundHandlerAdapter;
import java.lang.reflect.Method;
import java.util.Set;
import org.reflections.Reflections;
/*
 * @author huangwei
 * @emaill 1142488172@qq.com
 * @date 2024/1/1 19:38
 */
//服务端业务处理类
public class InvokeHandler extends ChannelInboundHandlerAdapter {
    //得到某个接口下某个实现类的名字
    private String getImplClassName(ClassInfo classInfo)throws Exception{
        //服务方接口和实现类所在的包路径
        String interfacePath = "org.example.rpc.producer";
        int lastDot = classInfo.getClassName().lastIndexOf(".");
        //接口名称
        String interfaceName = classInfo.getClassName().substring(lastDot);
        //接口字节码对象
        Class superClass = Class.forName(interfacePath+interfaceName);
        //反射得到某个接口下的所有实现类
        Reflections reflections = new Reflections(interfacePath);
        Set<Class> implClassSet = reflections.getSubTypesOf(superClass);
        if(implClassSet.size()==0){
            System.out.println("未找到实现类");
            return null;
        }else if(implClassSet.size()>1){
            /**
             * 思考一下,Spring是如何处理多个实现类的
             */
            return null;
        }else{
            //把集合转数组
            Class[] classes = implClassSet.toArray(new Class[0]);
            return classes[0].getName();//得到实现类名字
        }
    }

    /**
     * 读取客户端发来的数据并通过反射调用实现类方法
     * @param ctx
     * @param msg
     * @throws Exception
     */
    @Override
    public void channelRead(ChannelHandlerContext ctx, Object msg) throws Exception {
        ClassInfo classInfo = (ClassInfo) msg;
        Object clazz = Class.forName(getImplClassName(classInfo)).getDeclaredConstructor().newInstance();
        Method method = clazz.getClass().getMethod(classInfo.getMethodName(),classInfo.getTypes());
        //通过反射调用实现类方法
        Object result = method.invoke(clazz, classInfo.getObjects());
        ctx.writeAndFlush(result);
    }
}
上述代码作为业务处理类,读取消费方发来的数据,并根据得到的数据进行本地调用,然后把结果返回给消费方。
3.RPC服务端程序:Server
package org.example.rpc.server;

import io.netty.bootstrap.ServerBootstrap;
import io.netty.channel.ChannelFuture;
import io.netty.channel.ChannelInitializer;
import io.netty.channel.ChannelOption;
import io.netty.channel.ChannelPipeline;
import io.netty.channel.EventLoopGroup;
import io.netty.channel.nio.NioEventLoopGroup;
import io.netty.channel.socket.SocketChannel;
import io.netty.channel.socket.nio.NioServerSocketChannel;
import io.netty.handler.codec.serialization.ClassResolvers;
import io.netty.handler.codec.serialization.ObjectDecoder;
import io.netty.handler.codec.serialization.ObjectEncoder;

/*
 * @author huangwei
 * @emaill 1142488172@qq.com
 * @date 2024/1/1 21:09
 * 服务端程序
 */
public class Server {
    private int port;
    public Server(int port){
        this.port = port;
    }

    /**
     * 用 Netty 实现的网络服务器,采用 Netty 自带的 ObjectEncoder 和 ObjectDecoder作为编
     * 解码器(为了降低复杂度,这里并没有使用第三方的编解码器),当然实际开发时也可以采用 JSON或XML。
     */
    public void start(){
        EventLoopGroup bossGrop = new NioEventLoopGroup();
        EventLoopGroup workeGrop = new NioEventLoopGroup();
        try {
            ServerBootstrap serverBootstrap = new ServerBootstrap();
            serverBootstrap.group(bossGrop,workeGrop)
                    .channel(NioServerSocketChannel.class)
                    .option(ChannelOption.SO_BACKLOG,128)
                    .childOption(ChannelOption.SO_KEEPALIVE,true)
                    .localAddress(port).childHandler(new ChannelInitializer<SocketChannel>() {
                        @Override
                        protected void initChannel(SocketChannel socketChannel) throws Exception {
                            ChannelPipeline pipeline = socketChannel.pipeline();
                            //编码器
                            pipeline.addLast("encoder", new ObjectEncoder());
                            //解码器
                            pipeline.addLast("decoder",new ObjectDecoder(Integer.MAX_VALUE, ClassResolvers.cacheDisabled(null)));
                            //服务端业务处理类
                            pipeline.addLast(new InvokeHandler());
                        }
                    });

            ChannelFuture future = serverBootstrap.bind(port).sync();
            System.out.println("....... RPC is ready..........");
            future.channel().closeFuture().sync();


        }catch (Exception e){
            bossGrop.shutdownGracefully();
            workeGrop.shutdownGracefully();
            e.printStackTrace();
        }
    }

    public static void main(String[] args) {
        new Server(9999).start();
    }
}
上述代码是用 Netty 实现的网络服务器,采用 Netty 自带的 ObjectEncoder 和 ObjectDecoder作为编解码器(为了降低复杂度,这里并没有使用第三方的编解码器),当然实际开发时也可以采用 JSON 或XML。
4.3.3 Client Stub部分
1)客户端业务处理类:ResultHandler
package org.example.rpc.client;

/*
 * @author huangwei
 * @emaill 1142488172@qq.com
 * @date 2024/1/1 22:11
 */

import io.netty.channel.ChannelHandlerContext;
import io.netty.channel.ChannelInboundHandlerAdapter;

/**
 * 客户端业务处理类
 */
public class ResultHandler extends ChannelInboundHandlerAdapter {

    private Object response;

    public Object getResponse(){
        return response;
    }

    /**
     * 读取服务端返回的数据(远程调用的结果)
     * @param ctx
     * @param msg
     * @throws Exception
     */
    @Override
    public void channelRead(ChannelHandlerContext ctx, Object msg) throws Exception {
        response = msg;
        ctx.close();
    }
}
上述代码作为客户端的业务处理类读取远程调用返回的数据
2)RPC客户端程序:RPC远程代理RPCProxy
package org.example.rpc.consumer;

import io.netty.bootstrap.Bootstrap;
import io.netty.channel.ChannelFuture;
import io.netty.channel.ChannelInitializer;
import io.netty.channel.ChannelPipeline;
import io.netty.channel.EventLoopGroup;
import io.netty.channel.nio.NioEventLoopGroup;
import io.netty.channel.socket.SocketChannel;
import io.netty.channel.socket.nio.NioSocketChannel;
import io.netty.handler.codec.serialization.ClassResolvers;
import io.netty.handler.codec.serialization.ObjectDecoder;
import io.netty.handler.codec.serialization.ObjectEncoder;
import java.lang.reflect.InvocationHandler;
import java.lang.reflect.Method;
import java.lang.reflect.Proxy;
import org.example.rpc.client.ResultHandler;
import org.example.rpc.server.ClassInfo;

/*
 * @author huangwei
 * @emaill 1142488172@qq.com
 * @date 2024/1/1 22:14
 * 客户端代理类
 */
public class RPCProxy {

    /**
     * 根据接口创建代理对象
     */
    public static Object create(final Class target){
        return Proxy.newProxyInstance(target.getClassLoader(), new Class[]{target}, new InvocationHandler() {
            @Override
            public Object invoke(Object proxy, Method method, Object[] args) throws Throwable {
                //封装ClassInfo
                ClassInfo classInfo = new ClassInfo();
                classInfo.setClassName(target.getName());
                classInfo.setMethodName(method.getName());
                classInfo.setObjects(args);
                classInfo.setTypes(method.getParameterTypes());
                //开始发送Netty数据
                EventLoopGroup group = new NioEventLoopGroup();
                final ResultHandler resultHandler = new ResultHandler();
                try {
                    Bootstrap b = new Bootstrap();
                    b.group(group)
                            .channel(NioSocketChannel.class)
                            .handler(new ChannelInitializer<SocketChannel>() {
                                @Override
                                protected void initChannel(SocketChannel socketChannel) throws Exception {
                                    ChannelPipeline pipeline = socketChannel.pipeline();
                                    //编码器
                                    pipeline.addLast("encoder", new ObjectEncoder());
                                    //解码器 构造方法第一个参数设置二进制数据的最大字节数 第二个参数设置具体使用哪个类解析器
                                    pipeline.addLast("decoder", new ObjectDecoder(Integer.MAX_VALUE, ClassResolvers.cacheDisabled(null)));
                                    //客户端业务处理类
                                    pipeline.addLast("handler", resultHandler);
                                }
                            });
                    ChannelFuture future = b.connect("127.0.0.1",9999).sync();
                    future.channel().writeAndFlush(classInfo).sync();
                    future.channel().closeFuture().sync();
                }catch (Exception e){
                    e.printStackTrace();
                }finally {
                    group.shutdownGracefully();
                }
                return resultHandler.getResponse();
            }
        });
    }
}
上述代码是用 Netty 实现的客户端代理类,采用 Netty 自带的 ObjectEncoder 和 ObjectDecoder作为编解码器(为了降低复杂度,这里并没有使用第三方的编解码器),当然实际开发时也可以采用 JSON或 XML。
4.3.4 Client服务的调用方-消费方
package org.example.rpc;

import org.example.rpc.producer.SkuService;
import org.example.rpc.producer.UserService;
import org.example.rpc.consumer.RPCProxy;

/*
 * @author huangwei
 * @emaill 1142488172@qq.com
 * @date 2024/1/1 22:30
 * 服务调用方
 */
public class TestRPCV1 {
    public static void main(String[] args) {
        //第一次远程调用
        SkuService skuService = (SkuService) RPCProxy.create(SkuService.class);

        //第二次远程调用
        UserService service = (UserService) RPCProxy.create(UserService.class);
        System.out.println(skuService.findName("uid"));
        System.out.println(service.findById());

    }
}
消费方不需要知道底层的网络实现细节,就像调用本地方法一样成功发起了两次远程调用。
5.案例02:手写一个Tomcat-V2.0
本案例,咱们手写的是一个Web 容器命名为CustomCat,类似于Tomcat 的容器,用于处理HTTP请求。
Servlet 规范很复杂,所以本 Web 容器并没有去实现JavaEE 的Servlet 规范,所以说并不算是一个Servlet 容器。但是,其是类比着Tomcat 来写的,这里定义了自己的请求、响应及Servlet规范,分别命名为了HttpCustomRequest, HttpCustomResponse与HeroServlet。
5.1CustomCat容器需求
需求:软件工程师自定义一个Customcat提供给码农使用,码农只需要按照规定步骤,即可编写出自己的应用程序发布到CustomCat中供用户使用。
5.1.1 角色
Web容器(CustomCat)相关的角色:
CustomCat开发者,编写Hero核心代码的软件工程师,下文简称:工程师
CustomCat使用者,应用程序业务功能开发的软件工程师,下文简称:码农
应用程序使用者:用户
设计思路:
5.1.2 使用步骤-码农
码农使用CustomCat的步骤:
码农编写自己的应用程序:
导入CustomCat依赖坐标,并编写启动类
将自定义Servlet 放置到指定包下:例如 org.example.webapp
码农发布自己的服务:
码农将自己的接口URL按照固定规则发布:
- 按照后缀, .do 、 .action 、 无后缀
不管用何种规则:都将映射到自定义的Servlet(类名映射,忽略大小写)举例
http://localhost:8080/aaa/bbb/userservlet?name=xiong- 用户在访问应用程序: - 按照URL地址访问服务 - 如果没有指定的Servlet,则访问默认的Servlet ### 5.1.3 CustomCat开发思路-工程师 工程师实现CustomCat思路: - 第一步:创建CustomCat工程,导入依赖坐标 - 第二步:定义Servlet规范,HeroRequest、HeroResponse、HeroServlet - Servlet的规范其实是语言层面定义JavaEE - 第三步:实现Servlet规范 - HttpHeroRequest - HttpHeroResponse - DefaultHeroServlet【兜底】 - 第四步:编写CustomCat核心代码: - Server基于Netty实现:Servlet容器 - ServerHandler处理请求,映射到Servlet的容器的自定义Servlet(Map容器)中去 - 第五步:打包发布CustomCat ## 5.2 创建工程 ### 5.2.1 创建工程 创建一个普通的Maven 的Java 工程customcat。 ### 5.2.2 导入依赖
## 5.3 定义Servlet 规范

### 5.3.1 定义请求接口HttpCustomRequest
import java.util.List;
import java.util.Map;
/**
- 定义Servlet规范
*/
public interface CustomRequest {
//获取URI,包含请求参数,即问号后的内容(那么如果是post请求,参数不在问号后,如何处理呢?)
String getUri();
//获取请求路径,其不包含请求参数
String getPath();
//获取请求方法(Get、Post等)
String getMethod();
//获取所有请求参数
Map<String, List> getParameters();
//获取指定名称的请求参数
ListgetParameters(String name);
//获取指定名称的请求参数的第一个值
String getParamenter(String name);
}
### 5.3.2 定义响应接口CustomResponse
package org.example.servlet;
/**
- Servlet响应规范
*/
public interface CustomResponse {
//将响应写入到Channel
void write(String content)throws Exception;
}
### 5.3.3 定义Servlet 规范HeroServlet
package org.example.servlet;
/**
- 定义Servlet规范
*/
public abstract class Servlet {
//处理http的get请求
public abstract void doGet(CustomRequest request, CustomResponse response) throws Exception;
//处理http的post请求
public abstract void doPost(CustomRequest request, CustomResponse response)throws Exception;
}
## 5.4定义Tomcat服务器

### 5.4.1定义HttpCustomRequest类
package org.example.http;
import io.netty.handler.codec.http.HttpRequest;
import io.netty.handler.codec.http.QueryStringDecoder;
import java.util.List;
import java.util.Map;
import org.example.servlet.CustomRequest;
/**
实现对Servlet规范的默认是实现
*/
public class HttpCustomRequest implements CustomRequest {private HttpRequest request;
public HttpCustomRequest(HttpRequest request){
this.request = request;
}@Override
public String getUri() {
return request.getUri();
}@Override
public String getPath() {
QueryStringDecoder decoder = new QueryStringDecoder(request.uri());
return decoder.path();
}@Override
public String getMethod() {
return request.method().name();
}@Override
public Map<String, List> getParameters() {
QueryStringDecoder decoder = new QueryStringDecoder(request.uri());
return decoder.parameters();
}@Override
public ListgetParameters(String name) {
return getParameters().get(name);
}@Override
public String getParamenter(String name) {
Listparameters = getParameters(name);
if(parameters == null || parameters.size() == 0){
return null;
}
return parameters.get(0);
}
}
### 5.4.2定义服务器类HttpCustomResponse
package org.example.http;
import io.netty.buffer.Unpooled;
import io.netty.channel.ChannelHandlerContext;
import io.netty.handler.codec.http.DefaultFullHttpResponse;
import io.netty.handler.codec.http.FullHttpResponse;
import io.netty.handler.codec.http.HttpHeaderNames;
import io.netty.handler.codec.http.HttpHeaderValues;
import io.netty.handler.codec.http.HttpHeaders;
import io.netty.handler.codec.http.HttpRequest;
import io.netty.handler.codec.http.HttpResponseStatus;
import io.netty.handler.codec.http.HttpUtil;
import io.netty.handler.codec.http.HttpVersion;
import io.netty.util.internal.StringUtil;
import java.util.List;
import java.util.Map;
import org.example.servlet.CustomRequest;
import org.example.servlet.CustomResponse;
/**
- 实现对Servlet规范的默认是实现
*/
public class HttpCustomResponse implements CustomResponse {
private HttpRequest request;
private ChannelHandlerContext context;
public HttpCustomResponse(HttpRequest request,ChannelHandlerContext context){
this.request = request;
this.context = context;
}
@Override
public void write(String content) throws Exception {
//处理空的情况
if(StringUtil.isNullOrEmpty(content)){
return;
}
//创建响应对象
FullHttpResponse response = new DefaultFullHttpResponse(HttpVersion.HTTP_1_1, HttpResponseStatus.OK,
//根据响应体内容大型为response对象分配存储空间
Unpooled.wrappedBuffer(content.getBytes(“UTF-8”)));
//获取响应头
HttpHeaders headers = response.headers();
//设置响应体类型 (apache tomcat是如何处理不同的响应类型的)
headers.set(HttpHeaderNames.CONTENT_TYPE,”text/json”);
//设置响应体长度
headers.set(HttpHeaderNames.CONTENT_LENGTH,response.content().readableBytes());
//设置缓存过期事件
headers.set(HttpHeaderNames.EXPIRES,0);
//若http请求是长连接,则响应也使用长连接
if(HttpUtil.isKeepAlive(request)){
headers.set(HttpHeaderNames.CONNECTION, HttpHeaderValues.KEEP_ALIVE);
}
//将响应写入到Channel
context.writeAndFlush(response);
}
}
### **5.4.3** 定义DefaultHeroServlet类
package org.example.http;
import org.example.servlet.CustomRequest;
import org.example.servlet.CustomResponse;
import org.example.servlet.Servlet;
/**
Tomcatv1中对Servlet规范的默认实现
*/
public class DefaultHeroServlet extends Servlet {@Override
public void doGet(CustomRequest request, CustomResponse response)throws Exception {
String uri = request.getUri();;
String name = uri.substring(0,uri.indexOf(“?”));
response.write(“404 - no this servlet :”+name);
}@Override
public void doPost(CustomRequest customRequest, CustomResponse customResponse)throws Exception {
doGet(customRequest, customResponse);
}
}
### 5.4.4定义服务类Server
package org.example.server;
import io.netty.bootstrap.ServerBootstrap;
import io.netty.channel.ChannelFuture;
import io.netty.channel.ChannelInitializer;
import io.netty.channel.ChannelOption;
import io.netty.channel.ChannelPipeline;
import io.netty.channel.EventLoopGroup;
import io.netty.channel.nio.NioEventLoopGroup;
import io.netty.channel.socket.SocketChannel;
import io.netty.channel.socket.nio.NioServerSocketChannel;
import io.netty.handler.codec.http.HttpServerCodec;
import java.io.File;
import java.net.URL;
import java.util.Map;
import java.util.concurrent.ConcurrentHashMap;
import org.example.servlet.Servlet;
import org.example.util.DocumentNodeUtils;
/**
tomcat功能实现
*/
public class Server {
//key为Servlet的简单类名,value为对应Servlet实例
private Map<String, Servlet> nameToservletMap = new ConcurrentHashMap<>();
//key为Servlet的简单类名,value为对应Servlet类的全限定类名
private Map<String,String> nameToClassNameMap = new ConcurrentHashMap<>();
private String basePackage;
public Server(String basePackage){
this.basePackage = basePackage;
}//启动tomcat
public void start() throws Exception {
//加载指定包中的所有Servlet的类名
cacheClassName(basePackage);
//启动server服务
runServer();
}private void cacheClassName(String basePackage) {
URL resouce = this.getClass().getClassLoader().getResource(basePackage.replaceAll(“\.”,”/“));
//若目录没有资源则直接结束
if(resouce == null){
return;
}
//将URL资源转换为File资源
File dir = new File(resouce.getFile());
//遍历指定包及子孙包中的所有文件,查找所有.class文件
for (File file:dir.listFiles()){
if(file.isDirectory()){
//若当前遍历的file为目录,则递归调用当前方法
cacheClassName(basePackage+”.”+file.getClass());
}else if(file.getName().endsWith(“.class”)){
String simpleClassName = file.getName().replace(“.class”,””).trim();
//key为简单的类名,value为全限定类名 (是否可以参考Spring的三级缓存机制?)
nameToClassNameMap.put(simpleClassName.toLowerCase(),basePackage+”.”+simpleClassName);
}
}
}private void runServer()throws Exception {
EventLoopGroup parent = new NioEventLoopGroup();
EventLoopGroup child = new NioEventLoopGroup();
try {
ServerBootstrap bootstrap = new ServerBootstrap();
bootstrap.group(parent,child)
//指定存放请求的队列长度
.option(ChannelOption.SO_BACKLOG,1024)
//指定是否用心跳检测机制来检测长连接的存活性,即客户端的存活性
.childOption(ChannelOption.SO_KEEPALIVE,true)
.channel(NioServerSocketChannel.class)
.childHandler(new ChannelInitializer() {
@Override
protected void initChannel(SocketChannel ch) throws Exception {
ChannelPipeline pipeline = ch.pipeline();
pipeline.addLast(new HttpServerCodec());
pipeline.addLast(new ServerHandler(nameToservletMap,nameToClassNameMap));
}
});
int port = initPort();
ChannelFuture future = bootstrap.bind(port).sync();
System.out.println(“tomcat启动成功,监听端口号为:”+port);
future.channel().closeFuture().sync();
}finally {
parent.shutdownGracefully();
child.shutdownGracefully();
}
}private int initPort()throws Exception {
//初始化端口,读取配置文件server.xml中的端口号
int port =(int) DocumentNodeUtils.readNode(“//port”);
return port;
}
}
### **5.4.5** 定义服务端处理器ServerHandler
package org.example.server;
import io.netty.channel.ChannelHandlerContext;
import io.netty.channel.ChannelInboundHandlerAdapter;
import io.netty.handler.codec.http.HttpRequest;
import java.util.Map;
import java.util.Optional;
import org.example.http.DefaultHeroServlet;
import org.example.http.HttpCustomRequest;
import org.example.http.HttpCustomResponse;
import org.example.servlet.CustomRequest;
import org.example.servlet.CustomResponse;
import org.example.servlet.Servlet;
/**
HeroCat服务端处理器
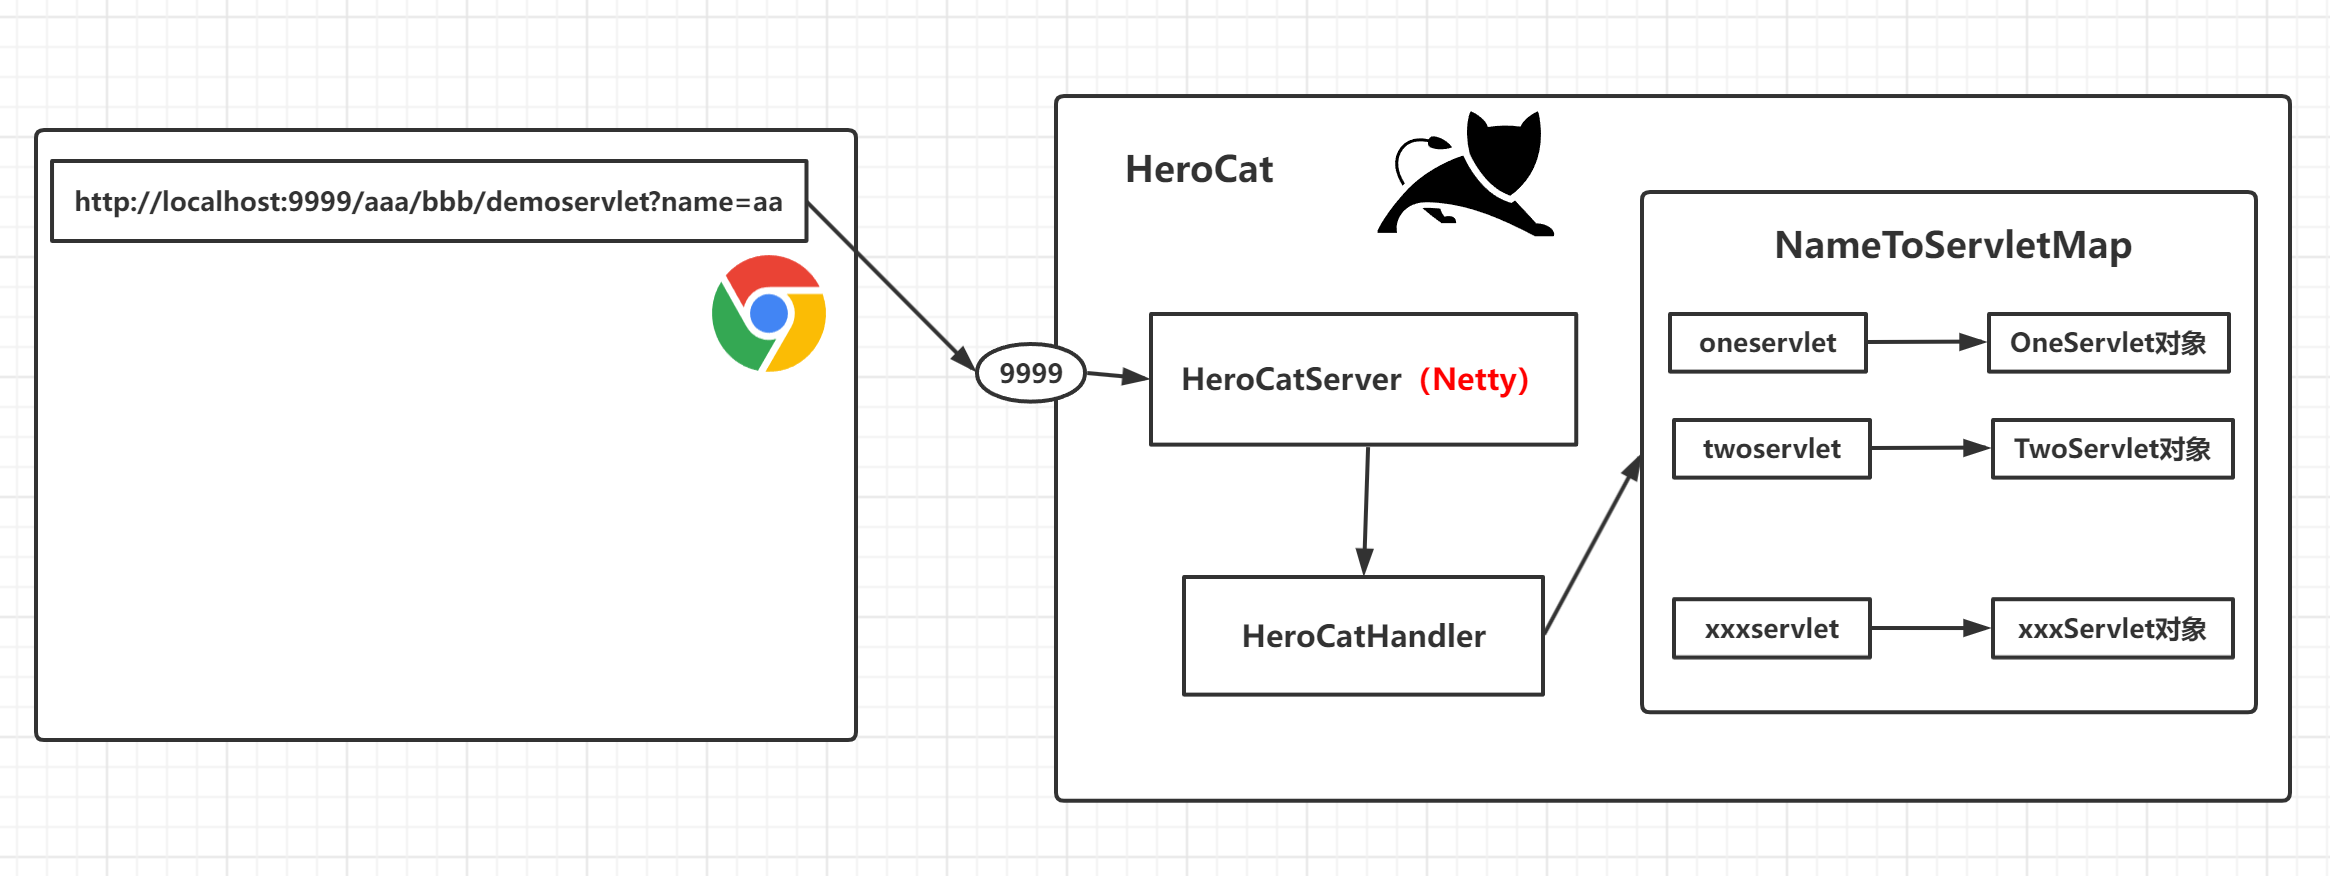
1)从用户请求URI中解析出要访问的Servlet名称
2)从nameToServletMap中查找是否存在该名称的key。若存在,则直接使用该实例,否则执
行第3)步3)从nameToClassNameMap中查找是否存在该名称的key,若存在,则获取到其对应的全限定
性类名,使用反射机制创建相应的serlet实例,并写入到nameToServletMap中,若不存在,则直
接访问默认Servlet
*/
public class ServerHandler extends ChannelInboundHandlerAdapter {
private Map<String,Servlet> nameTosServeltMap;
private Map<String,String> nameToClassNameMap;
public ServerHandler(Map<String, Servlet> nameToservletMap, Map<String, String> nameToClassNameMap) {
this.nameToClassNameMap = nameToClassNameMap;
this.nameTosServeltMap = nameToservletMap;
}@Override
public void channelRead(ChannelHandlerContext ctx, Object msg) throws Exception {
if(msg instanceof HttpRequest){
HttpRequest request = (HttpRequest) msg;
String uri = request.uri();
//从请求中解析出要访问的Servlet名称
String servletName = uri.substring(uri.lastIndexOf(“/“)+1,uri.indexOf(“?”)).toLowerCase();
Servlet servlet = new DefaultHeroServlet();
if(nameTosServeltMap.containsKey(servletName)){
servlet = nameTosServeltMap.get(servletName);
}else if(nameToClassNameMap.containsKey(servletName)){
//double-check,双重检测锁
if(nameTosServeltMap.get(servletName) == null){
synchronized (this){
if(nameTosServeltMap.get(servletName) == null){
//获取当前Servlet的全限定类名
String className = nameToClassNameMap.get(servletName);
//使用反射机制创建Servlet实例
servlet = (Servlet) Class.forName(className).getDeclaredConstructor().newInstance();
//将servlet实例写入到nameToServletMap
nameTosServeltMap.put(servletName,servlet);
}
}
}
}
//代码走到这肯定不为空
CustomRequest req = new HttpCustomRequest(request);
CustomResponse res = new HttpCustomResponse(request,ctx);
//根据不同的请求类型,调用Servlet实例的不同方法
if(request.method().name().equalsIgnoreCase(“GET”)){
servlet.doGet(req,res);
}else if(request.method().name().equalsIgnoreCase(“POST”)){
servlet.doPost(req,res);
}
ctx.close();
}
}@Override
public void exceptionCaught(ChannelHandlerContext ctx, Throwable cause) throws Exception {
cause.printStackTrace();
ctx.close();
}
}
### 5.4.6 定义启动类HeroCat
package org.example;
import org.example.server.Server;
/**
需求:软件工程师自定义一个Tomcat提供给码农使用,码农只需要按照规定步骤,即可编写出自己的
应用程序发布到HeroCat中供用户使用。
/
public class App {
/*- 码农使用tomcatCat的步骤:
- 码农编写自己的应用程序:
导入HeroCat依赖坐标,并编写启动类将自定义Servlet 放置到指定包下:例如 com.hero.webapp- 码农发布自己的服务:
码农将自己的接口URL按照固定规则发布:按照后缀, .do 、 .action 、 无后缀不管用何种规则:都将映射到自定义的Servlet(类名映射,忽略大小写)举例- 用户在访问应用程序:
按照URL地址访问服务如果没有指定的Servlet,则访问默认的Servlethttp://localhost:8080/skuServlet?name=xiong
*/
/**
- 工程师开发Tomcat的思路
- 第一步:创建HeroCat工程,导入依赖坐标
- 第二步:定义Servlet规范,HeroRequest、HeroResponse、HeroServlet
- Servlet的规范其实是语言层面定义JavaEE
- 第三步:实现Servlet规范HttpHeroRequest、HttpHeroResponse、DefaultHeroServlet【兜底】
- 第四步:编写HeroCat核心代码:
HeroCatServer基于Netty实现:Servlet容器HeroCatHandler处理请求,映射到Servlet的容器的自定义Servlet(Map容器)中去- 第五步:打包发布HeroCat
*/
public static void main(String[] args) throws Exception {
//http://localhost:8080/skuServlet?name=huangwei
Server server = new Server(“org.example.webapp”);
server.start();
}
}
## 5.5 定义业务SkuServlet
package org.example.webapp;
import org.example.servlet.CustomRequest;
import org.example.servlet.CustomResponse;
import org.example.servlet.Servlet;
/**
业务方法
*/
public class SkuServlet extends Servlet {@Override
public void doGet(CustomRequest request, CustomResponse response) throws Exception {
String uri = request.getUri();
String path = request.getPath();
String method = request.getMethod();
String name = request.getParamenter(“name”);
String content = “uri=”+uri+”\n”+”path=”+path+”\n”+”method=”+method+”\n”+”param = “+name;
response.write(content);
}@Override
public void doPost(CustomRequest request, CustomResponse response) throws Exception {
doGet(request, response);
}
}
# 6.案例03:600W+连接网络应用实战
## 6.1 Disruptor框架
### 6.1.1 什么是Disruptor?
LMAX是英国外汇交易公司,目标是成为世界上最快的交易平台。为了实现这一点,这家公司的技术团队使用 Java 平台实现非常低的延迟和高吞吐量的交易系统。经过一系列性能测试表明,使用队列在系统的各个阶段之间传递数据会导致延迟,当然吞吐量也就很难上的去,因此他们技术团队专注于优化这个领域,所以Disruptor诞生了。
Disruptor是一个通用解决方案,用于解决并发编程中的难题(低延迟与高吞吐量)。其本质还是一个队列(环形),与其他队列类似,也是基于生产者消费者模式设计,只不过这个队列很特别是一个环形队列。这个队列能够在无锁的条件下进行并行消费,也可以根据消费者之间的依赖关系进行先后次序消费。
说的简单点:生产者向RingBuffer中写入元素,消费从RingBuffer中消费元素。基于 Disruptor 开发的系统单线程能支撑每秒 600 万订单。
它与并发编程中的阻塞队列有什么不同?
- 低延时高通吐
- 快,它实在是太快了

6.1.2 通用步骤
1. 创建工厂类,用于生产Event对象
2. 创建Consumer监听类,用于监听,并处理Event
3. 创建Disruptor对象,并初始化一系列参数:工厂类、RingBuffer大小、线程池、单生产者或多生产者、Event等待策略
4. 编写Producer组件,向Disruptor容器中去投递Event
### 6.1.3 核心概念
#### 1)Disruptor
它是一个辅助类,持有RingBuffer、消费者线程池Executor、消费者仓 ConsumerRepository等引用。
#### 2)RingBuffer环形缓存器
RingBuffer基于数组的实现,数据结构是个首尾相接的环,用做在不同上下文(线程)间传递数据的buffer。RingBuffer拥有一个Sequencer序号器,这个序号器指向数组中下一个可用元素。

#### 3)Sequencer序号器
Sequencer序号器是Disruptor核心。
此接口有两个实现类:
- SingleProducerSequencer 单生产者
- MultiProducerSequencer 多生产者
#### 4)Sequence序号
Sequencer序号器中有Sequence序号,通过顺序递增的序号来编号和管理进行交换的Event。
Event的处理过程总是沿着序号逐个递增处理。
一个Sequence用于跟踪标识某个特定的事件处理者的处理进度。Producer和Consumer都有自己的Sequence,用来判断Consumer和Producer之间平衡,防止生产快,消费慢或生产慢,消费快等情况【上下游速度不一致问题】。相当于标识进度了
- 解决上下游消费速度不一致问题
- 异步提速
- 削峰填谷
#### 5)WaitStrategy等待策略
决定一个Consumer将如何等待Producer将Event置入RingBuffer
主要策略有:
- BlockingWaitStrategy:阻塞等待策略,最低效的策略,但其对CPU的消耗最小并且在各种不同部署环境中能提供更加一致的性能表现。
- SleepingWaitStrategy:休眠等待策略,性能表现跟BlockingWaitStrategy差不多,对CPU的消耗也类似,但其对生产者线程的影响最小,适合用于异步日志类似的场景。
- YieldingWaitStrategy:产生等待策略,性能最好,适合用于低延迟的系统,在要求极高性能且事件处理线程数小于CPU逻辑核心数的场景中,推荐使用。是无锁并行
#### 6)Event
从Producer到Consumer过程中所处理的数据单元
#### 7)EventHandler
由用户实现,并且代表Disruptor中的一个消费者的接口,我们的消费者逻辑都需要写在这里。
## 6.2 案例04:单生产者单消费者
目标:演示Disruptor高性能队列的基本用法,创建循环100个订单消息并消费之
步骤:
1. 创建OrderEventFactory来产生OrderEvent实例对象
2. 创建Consumer处理者OrderEventHandler,当Producer投递一条条数据时此Handler进行处理
3. 编写核心类Main创建disruptor对象,让其与Consumer处理者OrderEventHandler绑定,启动disruptor
4. 通过disruptor对象获取到ringBuffer容器。
5. 创建生产者OrderEventProducer,将消息放到RingBuffer容器
6. 循环100次,通过sendData()投递消息。sendData()方法的最后将消息发布出去,只有发布出去,消费者才能收到

### 1)OrderEvent
定义需要处理的OrderEvent类
package org.example.entity;
/**
订单对象,生产者要生产订单对象,消费者消费订单对象
*/
public class OrderEvent {
private long value;//订单价格public long getValue() {
return value;
}public OrderEvent setValue(long value) {
this.value = value;
return this;
}
}
### 2)OrderEventFactory

定义工厂类OrderEventFactory,用于创建OrderEvent对象。
package org.example.single;
import com.lmax.disruptor.EventFactory;
import org.example.entity.OrderEvent;
//建立一个工厂类,用于创建Event的实例(OrderEvent)
public class OrderEventFactory implements EventFactory
@Override
public OrderEvent newInstance() {
    //返回空的数据对象,不是null,OrderEvent,value属性还没有赋值
    return new OrderEvent();
}
}
### 3)OrderEventHandler

定义Event监听及处理类OrderEventHandler,用于处理OrderEvent
package org.example.single;
import com.lmax.disruptor.EventHandler;
import org.example.entity.OrderEvent;
//消费者
public class OrderEventHandler implements EventHandler
@Override
public void onEvent(OrderEvent orderEvent, long l, boolean b) throws Exception {
    //取出订单对象的价格
    System.out.println("消费者:"+orderEvent.getValue());
}
}
### 4)TestDisruptor

定义测试类,创建Disruptor对象,并初始化一系列参数:工厂类、RingBuffer大小、线程池、单生产者或多生产者、Event等待策略。
package org.example;
import com.lmax.disruptor.*;
import com.lmax.disruptor.dsl.Disruptor;
import com.lmax.disruptor.dsl.ProducerType;
import org.example.entity.Order;
import org.example.entity.OrderEvent;
import org.example.mutiple.ConsumerHandler;
import org.example.mutiple.EventExceptionHandler;
import org.example.mutiple.Producer;
import org.example.single.OrderEventFactory;
import org.example.single.OrderEventHandler;
import org.example.single.OrderEventProducer;
import java.nio.ByteBuffer;
import java.util.UUID;
import java.util.concurrent.CountDownLatch;
import java.util.concurrent.ExecutorService;
import java.util.concurrent.Executors;
import java.util.concurrent.TimeUnit;
/**
- 创建工厂类,用于生产Event对象
- 创建Consumer监听类,用于监听,并处理Event
- 创建Disruptor对象,并初始化一系列参数:工厂类、RingBuffer大小、线程池、单生产者或多生产者、Event等待策略
- 编写Producer组件,向Disruptor容器中去投递Event
/
public class App
{
public static void main( String[] args ) throws InterruptedException {
//单生产者消费
OrderEventFactory orderEventFactory = new OrderEventFactory();
int ringBufferSize = 8;
ExecutorService executor = Executors.newFixedThreadPool(Runtime.getRuntime().availableProcessors());
/*- 1、eventFactory:消息工厂对象
- 2、ringBufferSize:容器长度
- 3、executor:线程池,建议使用自定义的线程池,线程上限
- 4、ProducerType:单生产者或多生产者
- 5、waitStrategy:等待策略
*/
//1、实例化disrupotor对象
Disruptordisruptor = new Disruptor (orderEventFactory,ringBufferSize,executor,
ProducerType.SINGLE,new BlockingWaitStrategy());
//2、添加消费者的监听(去构建disruptor与消费者的一个关联关系)
disruptor.handleEventsWith(new OrderEventHandler());
//3、启动disruptor
disruptor.start();
//4、取到容器后通过生产者去生产消息
//获取实际存储数据的容器RingBuffer
RingBufferringBuffer = disruptor.getRingBuffer();
//生产者
OrderEventProducer producer = new OrderEventProducer(ringBuffer);
//先初始化ByteBuffer长度为8个字节
ByteBuffer byteBuffer = ByteBuffer.allocate(1024);
//生产100个orderEvent->value->i 0-99
for(long i=0;i<100;i++){
byteBuffer.putLong(0,i);
producer.sendData(byteBuffer);
}
disruptor.shutdown();
executor.shutdown();
}
- 编写Producer组件,向Disruptor容器中去投递Event
}
### 5)OrderEventProducer

定义Producer类,向Disruptor容器中去投递数据。
package org.example.single;
import com.lmax.disruptor.RingBuffer;
import java.nio.ByteBuffer;
import org.example.entity.OrderEvent;
public class OrderEventProducer {
//ringBuffer存储数据的一个容器
private RingBuffer<OrderEvent> ringBuffer;
public OrderEventProducer(RingBuffer<OrderEvent> ringBuffer) {
    this.ringBuffer = ringBuffer;
}

//生产者投递的数据
public void sendData(ByteBuffer data){
    //1、在生产者发送消息时,首先要从ringBuffer中找到一个可用的序号
    long sequnce = ringBuffer.next();
    try {
        //2.根据这个序号找到具体的OrderEvent元素, 此时获取到的OrderEvent对象是一个没有被赋值的空对象。value
        OrderEvent orderEvent = ringBuffer.get(sequnce);
        orderEvent.setValue(data.getLong(0));
    }catch (Exception e){
        e.printStackTrace();
    }finally {
        //4、提交发布操作,生产者最后要发布消息
        ringBuffer.publish(sequnce);
    }
}
}

## 6.3 案例05:多生产者和多消费者
时刻01

时刻02

### 1)Order
package org.example.entity;
/**
Disruptor 中的Event
*/
public class Order {
private String id;
private String name;
private double price;public String getId() {
return id;
}public Order setId(String id) {
this.id = id;
return this;
}public String getName() {
return name;
}public Order setName(String name) {
this.name = name;
return this;
}public double getPrice() {
return price;
}public Order setPrice(double price) {
this.price = price;
return this;
}
}
### 2)ConsumerHandler
package org.example.mutiple;
import com.lmax.disruptor.WorkHandler;
import java.util.Random;
import java.util.concurrent.TimeUnit;
import java.util.concurrent.atomic.AtomicInteger;
import org.example.entity.Order;
public class ConsumerHandler implements WorkHandler
//每个消费者都有自己的id
private String comsumerId;
//计数统计,多个消费者,所有的消费者总共消费了多个消息
private static AtomicInteger count = new AtomicInteger(0);
private Random random = new Random();
public ConsumerHandler(String comsumerId){
    this.comsumerId = comsumerId;
}

@Override
public void onEvent(Order event) throws Exception {
    //模拟消费者处理消息的耗时
    TimeUnit.MILLISECONDS.sleep(1* random.nextInt(5));
    System.out.println("当前消费者:"+this.comsumerId+",消费信息ID:"+event.getId());
    //count计数器+1,表示消费了一个消息
    count.incrementAndGet();
}
//返回所有消费者总共消费的消息个数
public int getCount(){
    return count.get();
}
}
### 3)Producer
package org.example.mutiple;
import com.lmax.disruptor.RingBuffer;
import org.example.entity.Order;
public class Producer {
private RingBuffer
//为生产者绑定ringBuffer
public Producer(RingBuffer<Order> ringBuffer){
    this.ringBuffer = ringBuffer;
}

//发送数据
public void sendData(String uuid){
    //1、获取到可用的sequece
    long sequece = ringBuffer.next();
    try {
        Order order = ringBuffer.get(sequece);
        order.setId(uuid);
    }catch (Exception e){
        e.printStackTrace();
    }finally {
        //发布序号
        ringBuffer.publish(sequece);
    }
}
}
### 4)TestMultiDisruptor
package org.example;
import com.lmax.disruptor.BlockingWaitStrategy;
import com.lmax.disruptor.EventFactory;
import com.lmax.disruptor.RingBuffer;
import com.lmax.disruptor.SequenceBarrier;
import com.lmax.disruptor.WorkerPool;
import com.lmax.disruptor.YieldingWaitStrategy;
import com.lmax.disruptor.dsl.Disruptor;
import com.lmax.disruptor.dsl.ProducerType;
import com.sun.org.apache.xpath.internal.operations.Or;
import java.nio.ByteBuffer;
import java.sql.Time;
import java.util.UUID;
import java.util.concurrent.CountDownLatch;
import java.util.concurrent.ExecutorService;
import java.util.concurrent.Executors;
import java.util.concurrent.TimeUnit;
import org.example.entity.Order;
import org.example.entity.OrderEvent;
import org.example.mutiple.ConsumerHandler;
import org.example.mutiple.EventExceptionHandler;
import org.example.mutiple.Producer;
import org.example.single.OrderEventFactory;
import org.example.single.OrderEventHandler;
import org.example.single.OrderEventProducer;
import org.w3c.dom.events.EventException;
/**
- 创建工厂类,用于生产Event对象
- 创建Consumer监听类,用于监听,并处理Event
- 创建Disruptor对象,并初始化一系列参数:工厂类、RingBuffer大小、线程池、单生产者或多生产者、Event等待策略
编写Producer组件,向Disruptor容器中去投递Event
/
public class App
{
public static void main( String[] args ) throws InterruptedException {
/*- 多实例消费者
/
//1、创建RingBuffer,Disruptor包含RingBuffer
RingBuffermutil_ringBuffer = RingBuffer.create( 1024,
ProducerType.MULTI,//多生产者
new EventFactory() {
@Override
public Order newInstance() {
return new Order();
}
},
1024
new YieldingWaitStrategy()
);
//2、创建ringBuffer屏障
SequenceBarrier sequenceBarrier = mutil_ringBuffer.newBarrier();
//3、创建多个消费者数组
ConsumerHandler[] consumers = new ConsumerHandler[10];
for(int i=0;i<consumers.length;i++){
consumers[i] = new ConsumerHandler(“C”+i);
}
//4、构建多消费者工作池
WorkerPoolworkerPool = new WorkerPool (mutil_ringBuffer,sequenceBarrier,new EventExceptionHandler(),consumers); //5、设置多个消费者的sequence序号,用于单独统计消费者的消费进度。消费进度让RingBuffer知道
mutil_ringBuffer.addGatingSequences(workerPool.getWorkerSequences());
//6、启动workPool
workerPool.start(Executors.newFixedThreadPool(5));//在实际开发,自定义线程池
//要生产100个生产者,每个生产者发送100个数据,总共投递10000
final CountDownLatch latch = new CountDownLatch(1);
//设置100个生产者向ringbuffer中去投递数据
for(int i=0;i<100;i++){
final Producer producer_mutil = new Producer(mutil_ringBuffer);
new Thread(()->{
try {
//每次一个生产者创建后就处理等待。先创建100个生产者,创建完100个生产者后再去发送数据
latch.await();
}catch (Exception e){
e.printStackTrace();
}
for(int j=0;j<100;j++){
producer_mutil.sendData(UUID.randomUUID().toString());
}
}).start();
}
//把所有线程创建完
TimeUnit.SECONDS.sleep(2);
//唤醒
latch.countDown();
//休眠10s,让生产者把100次循环走完
TimeUnit.SECONDS.sleep(10);
System.out.println(“任务总数:”+consumers[0].getCount());- 多实例消费者
}
}
### 5) EventExceptionHandler
package org.example.mutiple;
import com.lmax.disruptor.ExceptionHandler;
import org.example.entity.Order;
public class EventExceptionHandler implements ExceptionHandler
//消费时出现异常
@Override
public void handleEventException(Throwable throwable, long l, Order order) {
System.out.println(“消费出现异常”);
}
//启动时出现异常
@Override
public void handleOnStartException(Throwable throwable) {
}
//停止时出现异常
@Override
public void handleOnShutdownException(Throwable throwable) {

}
}
## 6.4 案例06:使用Disruptor提升Netty应用性能
### 6.4.1 构建Netty网络模型

#### 1)构建基础网络应用环境
- disruptor-netty-com是通用包
- disruptor-netty-client是客户端
- disruptor-netty-server是服务端
#### 2)TranslatorData
传输的数据对象
package org.example.entity;
import java.io.Serializable;
public class TranslatorData implements Serializable {
private String id;
private String name;
private String message;

public String getId() {
    return id;
}

public TranslatorData setId(String id) {
    this.id = id;
    return this;
}

public String getName() {
    return name;
}

public TranslatorData setName(String name) {
    this.name = name;
    return this;
}

public String getMessage() {
    return message;
}

public TranslatorData setMessage(String message) {
    this.message = message;
    return this;
}

@Override
public String toString() {
    return "TranslatorData{" +
            "id='" + id + '\'' +
            ", name='" + name + '\'' +
            ", message='" + message + '\'' +
            '}';
}
}
#### 3)NettyServe
package org.example.netty.server;
import io.netty.bootstrap.ServerBootstrap;
import io.netty.buffer.PooledByteBufAllocator;
import io.netty.channel.AdaptiveRecvByteBufAllocator;
import io.netty.channel.ChannelFuture;
import io.netty.channel.ChannelInitializer;
import io.netty.channel.ChannelOption;
import io.netty.channel.EventLoopGroup;
import io.netty.channel.nio.NioEventLoopGroup;
import io.netty.channel.socket.SocketChannel;
import io.netty.channel.socket.nio.NioServerSocketChannel;
import io.netty.handler.logging.LogLevel;
import io.netty.handler.logging.LoggingHandler;
import org.example.factory.MarshallingCodeCFactory;
public class NettyServer {
public NettyServer() {
//1、创建两个工作线程组:一个用于接受网络请求,另一个用于实际处理业务的线程组
EventLoopGroup bossGroup = new NioEventLoopGroup();
EventLoopGroup workeGroup = new NioEventLoopGroup();
//2、辅助类
ServerBootstrap bootstrap = new ServerBootstrap();
try {
bootstrap.group(bossGroup,workeGroup)
.channel(NioServerSocketChannel.class)
.option(ChannelOption.SO_BACKLOG,1024)
//表示缓冲区动态调配(自适应)
.option(ChannelOption.RCVBUF_ALLOCATOR, AdaptiveRecvByteBufAllocator.DEFAULT)
//缓存区 池化操作
.option(ChannelOption.ALLOCATOR, PooledByteBufAllocator.DEFAULT)
.handler(new LoggingHandler(LogLevel.INFO))
.childHandler(new ChannelInitializer
                    @Override
                    protected void initChannel(SocketChannel ch) throws Exception {
                        ch.pipeline().addLast(MarshallingCodeCFactory.buildMarshallingDecoder());
                        ch.pipeline().addLast(MarshallingCodeCFactory.buildMarshallingEncoder());
                        ch.pipeline().addLast(new ServerHandler());
                    }
                });

        //绑定端口,同步等等请求连接
        ChannelFuture cf = bootstrap.bind(8765).sync();
        System.err.println("Server Startup......");
        cf.channel().closeFuture().sync();
    }catch (Exception e){
        e.printStackTrace();
    }finally {
        bossGroup.shutdownGracefully();
        workeGroup.shutdownGracefully();
        System.out.println("Server Shutdown......");
    }
}
}
#### 4)ServerHandler
package org.example.netty.server;
import io.netty.channel.ChannelHandlerContext;
import io.netty.channel.ChannelInboundHandlerAdapter;
import org.example.entity.TranslatorData;
import org.example.factory.RingBufferWorkerPoolFactory;
import org.example.producer.MessageProducer;
public class ServerHandler extends ChannelInboundHandlerAdapter {
//无disruptor
@Override
public void channelRead(ChannelHandlerContext ctx, Object msg) throws Exception {
TranslatorData request = (TranslatorData) msg;
System.out.println(“Server端:”+request.toString());
//数据库持久化操作 IO读写——》交给一个线程池,去异步调用执行
TranslatorData response = new TranslatorData();
response.setId(“resp:”+request.getId());
response.setName(“resp:”+request.getName());
response.setMessage(“resp:”+request.getMessage());
//写出response响应信息:
ctx.writeAndFlush(response);
}
}
#### 5)NettyClient
package org.example.netty.client;
import io.netty.bootstrap.Bootstrap;
import io.netty.buffer.PooledByteBufAllocator;
import io.netty.channel.AdaptiveRecvByteBufAllocator;
import io.netty.channel.Channel;
import io.netty.channel.ChannelFuture;
import io.netty.channel.ChannelInitializer;
import io.netty.channel.ChannelOption;
import io.netty.channel.EventLoopGroup;
import io.netty.channel.nio.NioEventLoopGroup;
import io.netty.channel.socket.SocketChannel;
import io.netty.channel.socket.nio.NioSocketChannel;
import io.netty.handler.logging.LogLevel;
import io.netty.handler.logging.LoggingHandler;
import org.example.entity.TranslatorData;
import org.example.factory.MarshallingCodeCFactory;
public class NettyClinet {
public static final String HOST = "127.0.0.1";

public static final int PORT = 8765;

//扩展 完善 池化 ConcurrentHashMap<Key --- String,value --->Channel>
private Channel channel;

//1、创建工作线程组:用于实际处理业务的线程组
private EventLoopGroup workGroup = new NioEventLoopGroup();

private ChannelFuture cf;

public NettyClinet() {
    this.connect(HOST, PORT);
}
private void connect(String host, int port) {
    //2、辅助类 注意Client和Server是不一样的
    Bootstrap bootstrap = new Bootstrap();
    try {
        //绑定线程组
        bootstrap.group(workGroup)
                .channel(NioSocketChannel.class)
                //表示缓冲区动态调配 自适应
                .option(ChannelOption.RCVBUF_ALLOCATOR, AdaptiveRecvByteBufAllocator.DEFAULT)
                //缓存区 池化操作
                .option(ChannelOption.ALLOCATOR, PooledByteBufAllocator.DEFAULT)
                .handler(new LoggingHandler(LogLevel.INFO))
                .handler(new ChannelInitializer<SocketChannel>() {
                    @Override
                    protected void initChannel(SocketChannel ch) throws Exception {
                        //网络传递对象,客户端和服务端都要做编码和解码操作
                        ch.pipeline().addLast(MarshallingCodeCFactory.buildMarshallingDecoder());
                        ch.pipeline().addLast(MarshallingCodeCFactory.buildMarshallingEncoder());
                        ch.pipeline().addLast(new ClientHandler());
                    }
                });
        //绑定端口,同步等待请求连接
        this.cf = bootstrap.connect(host, port).sync();
        System.err.println("Client connected.....");
        //进行数据发送,首先获取channel
        this.channel = cf.channel();

    } catch (Exception e) {
        e.printStackTrace();
    }
}
//发送数据的方法,提供给外部使用
public void sendData() {
    for (int i = 0; i < 6000000; i++) {
        TranslatorData request = new TranslatorData();
        request.setId(String.valueOf(i));
        request.setName("请求消息名称 "+i);
        request.setMessage("请求消息内容 "+i);
        this.channel.writeAndFlush(request);
    }
}

public void close()throws Exception{
    cf.channel().closeFuture().sync();
    workGroup.shutdownGracefully();
    System.out.println("Server Shtudown.....");
}
}
#### 6)ClientHandler
package org.example.netty.client;
import io.netty.channel.ChannelHandlerContext;
import io.netty.channel.ChannelInboundHandlerAdapter;
import io.netty.util.ReferenceCountUtil;
import org.example.entity.TranslatorData;
import org.example.factory.RingBufferWorkerPoolFactory;
import org.example.producer.MessageProducer;
public class ClientHandler extends ChannelInboundHandlerAdapter {
@Override
public void channelRead(ChannelHandlerContext ctx, Object msg) throws Exception {

        try {
            TranslatorData response = (TranslatorData) msg;
            System.out.println("Client端:"+response.toString());
        }finally {
            //一定要注意,用完了缓存要进行释放
            ReferenceCountUtil.release(msg);
        }

}
}
#### 7)启动类

##### 服务端NettyServerApplication
package org.example;
import com.lmax.disruptor.BlockingWaitStrategy;
import com.lmax.disruptor.dsl.ProducerType;
import org.example.consumer.MessageConsumer;
import org.example.factory.RingBufferWorkerPoolFactory;
import org.example.netty.producer.MessageConsumerHandle;
import org.example.netty.server.NettyServer;
import org.springframework.boot.SpringApplication;
import org.springframework.boot.autoconfigure.SpringBootApplication;
@SpringBootApplication
public class NettyServerApplication {
public static void main(String[] args)throws Exception {
    SpringApplication.run(NettyServerApplication.class,args);
    new NettyServer();
}
}
##### 客户端NettyClientApplication
package org.example;
import com.lmax.disruptor.BlockingWaitStrategy;
import com.lmax.disruptor.YieldingWaitStrategy;
import com.lmax.disruptor.dsl.ProducerType;
import org.example.consumer.MessageConsumer;
import org.example.factory.RingBufferWorkerPoolFactory;
import org.example.netty.client.NettyClinet;
import org.example.netty.consumer.MessageProducerHandle;
import org.springframework.boot.SpringApplication;
import org.springframework.boot.autoconfigure.SpringBootApplication;
@SpringBootApplication
public class NettyClientApplication {
public static void main(String[] args)throws Exception {
    SpringApplication.run(NettyClientApplication.class,args);
    //建立连接发送消息
    new NettyClinet().sendData();
}
}
测试:
启动server

启动client,发送数据。

到此为止,我们已经构建好了网络模型,可以接收和发送消息了。
### 6.4.2 整合Disruptor

在使用Netty进行接收处理数据时,尽量不要在工作线程上编写自己的代理逻辑,会降低netty性能。可以利用异步机制,如使用线程池异步处理,如果使用线程池就意味使用阻塞对列,可以替换为Disruptor提高性能。
加入disruptor提升性能:
Event是客户端发到服务端的数据,serverHandler获取到Event后,不在serverHandler中对数据做处理,将Event通过生产者交给Disruptor组件。消费者c1、c2、c3通过负载均衡去消费投递过来的数据。服务端最终要返回一个响应数据给客户端。客户端这边也不是在ClientHandler中处理数据,也要构建一个生产消费者模型,有多个线程去处理。

#### 1)TranslatorDataWapper
传输的对象包装类
package org.example.entity;
import io.netty.channel.ChannelHandlerContext;
import java.io.Serializable;
public class TranslatorDataWapper implements Serializable {
private TranslatorData data;
private ChannelHandlerContext ctx;
public TranslatorData getData() {
    return data;
}

public TranslatorDataWapper setData(TranslatorData data) {
    this.data = data;
    return this;
}

public ChannelHandlerContext getCtx() {
    return ctx;
}

public TranslatorDataWapper setCtx(ChannelHandlerContext ctx) {
    this.ctx = ctx;
    return this;
}
}
#### 2)MessageProducer

生产者
package org.example.producer;
import com.lmax.disruptor.RingBuffer;
import io.netty.channel.ChannelHandlerContext;
import org.example.entity.TranslatorData;
import org.example.entity.TranslatorDataWapper;
public class MessageProducer {
private String producerId;
private RingBuffer
public MessageProducer(String producerId,RingBuffer<TranslatorDataWapper> ringBuffer){
    this.producerId = producerId;
    this.ringBuffer = ringBuffer;
}

public void onData(TranslatorData data, ChannelHandlerContext ctx){
    long sequence = ringBuffer.next();
    try {
        TranslatorDataWapper wapper = ringBuffer.get(sequence);
        wapper.setData(data);
        wapper.setCtx(ctx);
    }finally {
        ringBuffer.publish(sequence);
    }
}
}
#### 3)MessageConsumer

消费者
package org.example.consumer;
import com.lmax.disruptor.WorkHandler;
import org.example.entity.TranslatorDataWapper;
public abstract class MessageConsumer implements WorkHandler
protected String consumerId;
public MessageConsumer(String consumerId) {
    this.consumerId = consumerId;
}

public String getConsumerId() {
    return consumerId;
}

public MessageConsumer setConsumerId(String consumerId) {
    this.consumerId = consumerId;
    return this;
}
}
#### 4)RingBufferWorkerPoolFactory

创建连接池工厂类
package org.example.factory;
import com.lmax.disruptor.EventFactory;
import com.lmax.disruptor.ExceptionHandler;
import com.lmax.disruptor.RingBuffer;
import com.lmax.disruptor.SequenceBarrier;
import com.lmax.disruptor.WaitStrategy;
import com.lmax.disruptor.WorkerPool;
import com.lmax.disruptor.dsl.ProducerType;
import java.util.Map;
import java.util.concurrent.ConcurrentHashMap;
import java.util.concurrent.Executors;
import org.example.consumer.MessageConsumer;
import org.example.entity.TranslatorDataWapper;
import org.example.producer.MessageProducer;
public class RingBufferWorkerPoolFactory {
//单例
private static class SingletonHolder{
static final RingBufferWorkerPoolFactory instance = new RingBufferWorkerPoolFactory();
}
private RingBufferWorkerPoolFactory(){}
public static RingBufferWorkerPoolFactory getInstance(){
    return SingletonHolder.instance;
}
//需要生产者池和消费者池管理生产和消费者
private static Map<String, MessageProducer> producers = new ConcurrentHashMap<String, MessageProducer>();

private static Map<String, MessageConsumer> consumers = new ConcurrentHashMap<String, MessageConsumer>();

private RingBuffer<TranslatorDataWapper> ringBuffer;

private SequenceBarrier sequenceBarrier;
private WorkerPool<TranslatorDataWapper> workerPool;
//初始化ProducerType生产者类型,是多生产还是单生产。MessageConsumer[]多消费
public void initAndStart(ProducerType type,int bufferSize, WaitStrategy waitStrategy,MessageConsumer[] messageConsumers){
//    1、构建ringBuffer对象
    this.ringBuffer = RingBuffer.create(type, new EventFactory<TranslatorDataWapper>() {
        @Override
        public TranslatorDataWapper newInstance() {
            return new TranslatorDataWapper();
        }
    },bufferSize,waitStrategy);
//    2、设置序号栅栏
    this.sequenceBarrier = this.ringBuffer.newBarrier();
//    3、设置工作池
    this.workerPool = new WorkerPool<TranslatorDataWapper>(this.ringBuffer,this.sequenceBarrier,new  EventExceptionHandler(),messageConsumers);
    //4、把所构建的消费者置入池中
    for (MessageConsumer mc:messageConsumers) {
        this.consumers.put(mc.getConsumerId(),mc);
    }
    //5、添加我们的sequences
    this.ringBuffer.addGatingSequences(this.workerPool.getWorkerSequences());
    //6、启动我们的工作池
    this.workerPool.start(Executors.newFixedThreadPool(Runtime.getRuntime().availableProcessors()/2));

}

public MessageProducer getMessageProducer(String producerId){
    //池里有直接获取生产者
    MessageProducer messageProducer = this.producers.get(producerId);
    if(null == messageProducer){
        messageProducer = new MessageProducer(producerId,this.ringBuffer);
        this.producers.put(producerId,messageProducer);
    }
    return messageProducer;
}

static class EventExceptionHandler implements ExceptionHandler<TranslatorDataWapper> {

    @Override
    public void handleEventException(Throwable throwable, long l, TranslatorDataWapper translatorDataWapper) {

    }

    @Override
    public void handleOnStartException(Throwable throwable) {

    }

    @Override
    public void handleOnShutdownException(Throwable throwable) {

    }
}
}
### 6.4.3 百万级连接接入

#### 1)修改serverHandler
package org.example.netty.server;
import io.netty.channel.ChannelHandlerContext;
import io.netty.channel.ChannelInboundHandlerAdapter;
import org.example.entity.TranslatorData;
import org.example.factory.RingBufferWorkerPoolFactory;
import org.example.producer.MessageProducer;
public class ServerHandler extends ChannelInboundHandlerAdapter {
//无disruptor
//@Override
//public void channelRead(ChannelHandlerContext ctx, Object msg) throws Exception {
// TranslatorData request = (TranslatorData) msg;
// System.out.println(“Server端:”+request.toString());
// //数据库持久化操作 IO读写——》交给一个线程池,去异步调用执行
// TranslatorData response = new TranslatorData();
// response.setId(“resp:”+request.getId());
// response.setName(“resp:”+request.getName());
// response.setMessage(“resp:”+request.getMessage());
// //写出response响应信息:
// ctx.writeAndFlush(response);
//
//}
@Override
public void channelRead(ChannelHandlerContext ctx, Object msg) throws Exception {
    TranslatorData request = (TranslatorData) msg;
    //自己的服务应用应该有一个ID生成规则
    String producerId = "code:seesionId:001";
    MessageProducer messageProducer = RingBufferWorkerPoolFactory.getInstance().getMessageProducer(producerId);
    messageProducer.onData(request,ctx);

}
}
#### 2)MessageConsumerImpl4Server

服务器端消费者:用来处理客户端发送来数据的逻辑
package org.example.netty.producer;
import io.netty.channel.ChannelHandlerContext;
import org.example.consumer.MessageConsumer;
import org.example.entity.TranslatorData;
import org.example.entity.TranslatorDataWapper;
public class MessageConsumerHandle extends MessageConsumer {
public MessageConsumerHandle(String consumerId) {
super(consumerId);
}
@Override
public void onEvent(TranslatorDataWapper event) throws Exception {
    TranslatorData request = event.getData();
    ChannelHandlerContext ctx = event.getCtx();
    //1、业务逻辑处理:
    System.err.println("Server端:"+request.toString());
    //2、回送响应消息:
    TranslatorData response = new TranslatorData();
    response.setId("resp:"+request.getId());
    response.setName("resp:"+request.getName());
    response.setMessage("resp:"+request.getMessage());
    //写出response响应信息
    ctx.writeAndFlush(response);
}
}
#### 3)修改clientHandler
package org.example.netty.client;
import io.netty.channel.ChannelHandlerContext;
import io.netty.channel.ChannelInboundHandlerAdapter;
import io.netty.util.ReferenceCountUtil;
import org.example.entity.TranslatorData;
import org.example.factory.RingBufferWorkerPoolFactory;
import org.example.producer.MessageProducer;
public class ClientHandler extends ChannelInboundHandlerAdapter {
//@Override
//public void channelRead(ChannelHandlerContext ctx, Object msg) throws Exception {
//
//        try {
//            TranslatorData response = (TranslatorData) msg;
//            System.out.println("Client端:"+response.toString());
//        }finally {
//            //一定要注意,用完了缓存要进行释放
//            ReferenceCountUtil.release(msg);
//        }
//
//}
@Override
public void channelRead(ChannelHandlerContext ctx, Object msg) throws Exception {
        TranslatorData response = (TranslatorData) msg;
        String producerId = "code:sessionId:002";
        MessageProducer messageProducer = RingBufferWorkerPoolFactory.getInstance().getMessageProducer(producerId);
        messageProducer.onData(response,ctx);
}
}
#### 4)MessageConsumerImpl4Client

客户端处理服务端返回数据
package org.example.netty.producer;
import io.netty.channel.ChannelHandlerContext;
import org.example.consumer.MessageConsumer;
import org.example.entity.TranslatorData;
import org.example.entity.TranslatorDataWapper;
public class MessageConsumerHandle extends MessageConsumer {
public MessageConsumerHandle(String consumerId) {
super(consumerId);
}
@Override
public void onEvent(TranslatorDataWapper event) throws Exception {
    TranslatorData request = event.getData();
    ChannelHandlerContext ctx = event.getCtx();
    //1、业务逻辑处理:
    System.err.println("Server端:"+request.toString());
    //2、回送响应消息:
    TranslatorData response = new TranslatorData();
    response.setId("resp:"+request.getId());
    response.setName("resp:"+request.getName());
    response.setMessage("resp:"+request.getMessage());
    //写出response响应信息
    ctx.writeAndFlush(response);
}
}
#### 5)启动类

##### 服务端
package org.example;
import com.lmax.disruptor.BlockingWaitStrategy;
import com.lmax.disruptor.dsl.ProducerType;
import org.example.consumer.MessageConsumer;
import org.example.factory.RingBufferWorkerPoolFactory;
import org.example.netty.producer.MessageConsumerHandle;
import org.example.netty.server.NettyServer;
import org.springframework.boot.SpringApplication;
import org.springframework.boot.autoconfigure.SpringBootApplication;
@SpringBootApplication
public class NettyServerApplication {
//public static void main(String[] args)throws Exception {
//    SpringApplication.run(NettyServerApplication.class,args);
//    new NettyServer();
//}

public static void main(String[] args)throws Exception {
    SpringApplication.run(NettyServerApplication.class,args);
    MessageConsumer[] consumers = new MessageConsumer[4];

    for(int i=0;i< consumers.length;i++){
        MessageConsumer messageConsumer = new MessageConsumerHandle("code:serverId:"+i);
        consumers[i] = messageConsumer;
    }

    RingBufferWorkerPoolFactory.getInstance().initAndStart(ProducerType.MULTI,1024*1024,new BlockingWaitStrategy(),consumers);
    new NettyServer();
}
}
##### 客户端
package org.example;
import com.lmax.disruptor.BlockingWaitStrategy;
import com.lmax.disruptor.YieldingWaitStrategy;
import com.lmax.disruptor.dsl.ProducerType;
import org.example.consumer.MessageConsumer;
import org.example.factory.RingBufferWorkerPoolFactory;
import org.example.netty.client.NettyClinet;
import org.example.netty.consumer.MessageProducerHandle;
import org.springframework.boot.SpringApplication;
import org.springframework.boot.autoconfigure.SpringBootApplication;
@SpringBootApplication
public class NettyClientApplication {
//public static void main(String[] args)throws Exception {
//    SpringApplication.run(NettyClientApplication.class,args);
//    //建立连接发送消息
//    new NettyClinet().sendData();
//}


public static void main(String[] args)throws Exception {
    SpringApplication.run(NettyClientApplication.class,args);
    MessageConsumer[] consumers = new MessageConsumer[4];
    for(int i=0;i<consumers.length;i++){
        MessageConsumer messageConsumer = new MessageProducerHandle("code:clientId:"+i);
        consumers[i] = messageConsumer;
    }
    RingBufferWorkerPoolFactory.getInstance().initAndStart(ProducerType.MULTI,
            1024*1024,
            //new YieldingWaitStrategy(),
            new BlockingWaitStrategy(),
            consumers);
    //建立连接发送消息
    new NettyClinet().sendData();
}
}
#### 6)测试
//发送数据的方法,提供给外部使用
public void sendData() {
    for (int i = 0; i < 6000000; i++) {
        TranslatorData request = new TranslatorData();
        request.setId(String.valueOf(i));
        request.setName("请求消息名称 "+i);
        request.setMessage("请求消息内容 "+i);
        this.channel.writeAndFlush(request);
    }
}
可以看到百万级别的连接已经建立